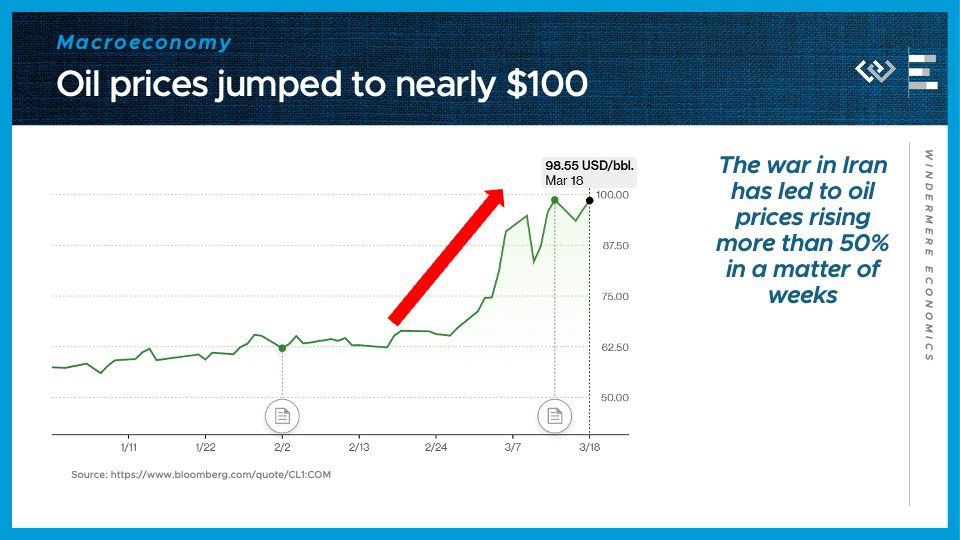
Facebook
 X
X
 Pinterest
 Copy Link
Urban farming can be a fun way to produce your own nutritious and sustainable food supply for your household while learning about self-sufficiency and gardening. Though urban farming likely won’t replace your household’s entire food intake, it is an environmentally friendly complement that can help lower your reliance upon commercial grocery stores over time.
A Quick Guide to Urban Farming
What is urban farming?
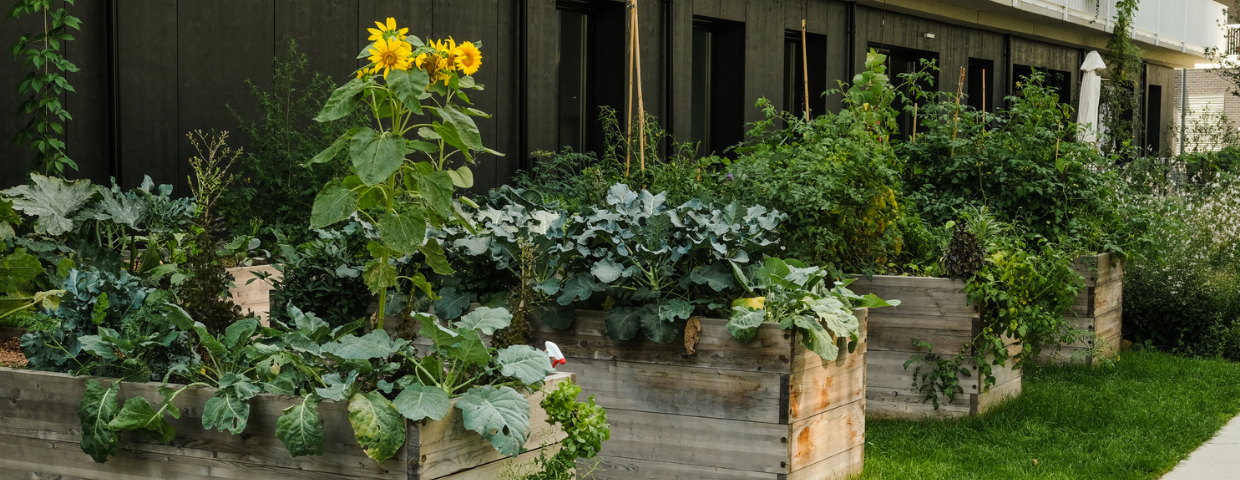
Urban farming or urban agriculture comes in many forms. Whether it’s a backyard or rooftop garden, a community agricultural space, or a small balcony plot, urban farming is the practice of cultivating food by those who live in cities or densely populated areas. Typically using raised garden beds to house produce, urban farming promotes sustainability, health, and a connection to nature. Whether you’re looking to grow a few simple fruits and vegetables or seek to cultivate a flourishing garden, here’s how you can get started.
Plot Out Your Garden
Whether you have a spacious backyard waiting to be tilled into gardening heaven or a smaller, unused section of your flower beds, how much space you’re working with will determine the arrangement of your urban farm. Research the crops you intend to plant and how much space they require, then take measurements in your gardening space before buying materials. Your raised gardening beds should be anywhere from six to thirty-six inches deep. Keeping them less than four feet wide will make it easier to reach across when watering, weeding, and planting.
Planting Your Garden
Once you’ve plotted out your garden space, there are a series of decisions to make about your garden; namely which crops you want to grow, how you’ll pot other plants and flowers, whether you’re going to start from seeds or seedlings, and deciding between manual and automatic watering. If you’re starting from seeds, know that the growing process will take longer, whereas seedlings can help to speed things up. Creating an automatic watering system requires an upfront investment, but you’ll save time, and you won’t have worry about under-watering or dehydrating your garden.
Raising Chickens and Keeping Bees
Keeping animals on your property presents new opportunities for sustenance, but it also introduces new challenges. Two animals urban farmers often choose to raise are chickens and bees, which take up a lot less space that other livestock. Before starting either venture, check your local zoning laws.
If you intend to raise chickens, you’ll need to build a coop first. The size of your chicken coop will depend on whether your chickens are able to forage outside the coop or not. If you have the space to let the chickens out, allow two to three square feet per bird in the coop. If the chickens must stay in the coop, you’ll want to make sure they have plenty of space, so it’s recommended to allow five to ten square feet per bird.
The key features of a chicken coop include roosts, nest boxes, dust baths, lighting, and protection from local predators. Search online or locally for pre-made chicken coops that fit your property’s needs or make it a DIY project. A commercial poultry feed will provide your chickens with the basic nutrients they need, but keep in mind that many foods outside of their normal diet can alter egg flavor and have adverse health effects. So, if you’re thinking about incorporating table scraps into their diet, make sure those foods agree with their systems before doing so.
To keep bees at home, start by reaching out to local beekeeping associations to inquire about purchasing bees and when you can expect your colony to arrive. Once you have a timeline set, you can go about gathering supplies. There are two common hive systems used for keeping bees: a Langstroth hive; which is a system of stacked rectangular boxes with removable frames, and a top-bar hive; which is a series of horizontally connected boxes. Gear up by purchasing protective beekeeping clothing, tools, and feeding supplies. After you introduce your bees to their new hive, continually monitor their behavior and tend to their seasonal needs. Spring is generally the best time of year to start a hive, since it gives bees plenty of time to build up their colony and produce and store honey before winter arrives.
For more information on sustainable gardening practices, read our blog post below: