8800 20th Avenue NE #B202 Seattle, WA 98115 Listed: $440,000
Beds: 2
Baths: 2
Size: 1,098 sqft
Type: Condominium
Year Built: 1979
Heating: Baseboard, Forced Air
Cooling: None
HOA Fee: $637 Monthly
Pets Allowed: Cats OK
County: King
Subdivision: Maple Leaf
MLS #: 2553608
CLIP #: 4202152358
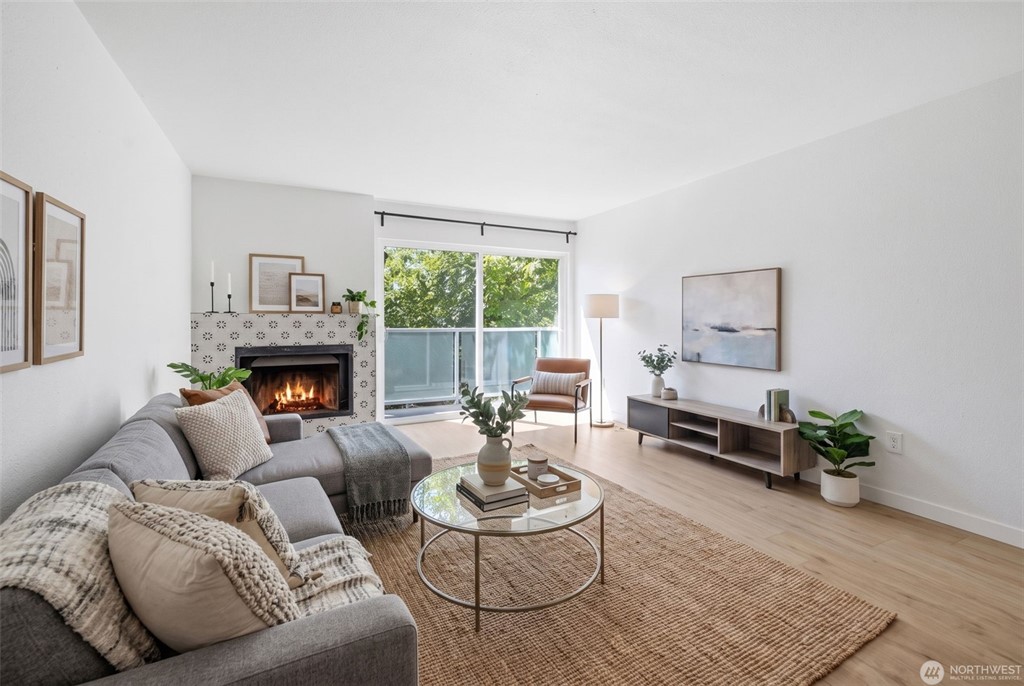
Rare townhome-style condo offering the perfect blend of privacy, sophisticated design, and an unbeatable Maple Leaf location. Thoughtfully remodeled with quartz countertops, premium appliances, luxury vinyl plank flooring, and a cozy fireplace, this home is enhanced by Philips Hue smart lighting, smart thermostats, skylights, and a private balcony. The sunlit loft creates the ideal home office or flex space, while custom PAX closet systems, abundant storage, a Miele washer & dryer, dedicated storage unit, and parking add everyday convenience. Well-managed HOA with no upcoming special assessments. Minutes to Maple Leaf Reservoir, Green Lake, University Village, light rail, dining, shopping, and I-5.
If you’re selling your home, there’s a good chance you’ll hear the word appraisal shortly after accepting an offer. While it may feel like just another step in the transaction, a home appraisal plays an important role in many home sales, especially when a buyer is financing their purchase with a mortgage.
For many sellers, the appraisal process can feel daunting and mysterious. Who orders it? What does the appraiser actually look at? And what happens if the home appraises for less than the agreed-upon purchase price?
Understanding what happens during a home appraisal can help you prepare your home, set realistic expectations, and navigate the process with confidence. Here’s what every seller should know.
What Is a Home Appraisal?
A home appraisal is an independent evaluation of a home’s current market value conducted by a licensed appraiser. In most financed home purchases, lenders require an appraisal before approving the buyer’s loan to verify that the property’s value aligns with the amount they’re lending.
Although the buyers generally pay for the appraisal as part of their closing costs, the appraiser’s responsibility is to the lender. Their job is to provide an objective opinion of the home’s value by evaluating the property itself and comparing it to similar homes that have recently sold nearby.
When Does the Appraisal Happen?
Once a seller accepts an offer and the purchase agreement is signed, the buyer’s lender will usually order the appraisal early in the transaction. The timing can vary, but it typically occurs within the first few weeks of escrow.
The appraiser will coordinate a time to visit the property. While sellers don’t necessarily need to be present during the appointment, someone will need to provide access to the home. After the inspection, it may take several days for the completed appraisal report to be delivered to the lender.
What Does an Appraiser Look For?
During the visit, the appraiser evaluates both the home’s condition and the features that contribute to its market value. They also consider recent sales of comparable homes in the area, often called “comps”, to help determine how your home compares to similar properties in the current market.
They’ll typically examine:
Overall size and layout
Number of bedrooms and bathrooms
Interior and exterior condition
Quality of construction finishes
Major systems such as the roof, HVAC, plumbing, and electrical
Recent renovations or improvements
Lost size and usable outdoor space
Garage, parking, or additional structures
Energy-efficient features or notable upgrades
The appraiser also takes photographs and measurements of the property to include in the final report. It’s important to remember that an appraisal isn’t the same as a home inspection. While inspectors look for potential defects or maintenance issues, appraisers focus primarily on determining the home’s market value based on its quality and features.
Can Sellers Prepare for an Appraisal?
While sellers can’t control the final valuation, they can take several steps to present the home in its best light.
Complete small repairs
Finish ongoing projects
Improve curb appeal
Clean and declutter
Create a list of improvements
What Happens If the Appraisal Comes in Low?
If the appraised value meets or exceeds the purchase price, the transaction typically moves forward as planned. The buyer’s lender now has confirmation that the property’s value supports the loan amount, allowing financing to continue toward closing.
A low appraisal doesn’t automatically mean the sale is over, but it may require additional conversations between the buyer and seller. Some possible outcomes include:
The buyer covers the difference
The seller reduces the price
Both parties negotiate
The buyer challenges the appraisal
The transaction doesn’t move forward
While a low appraisal can feel discouraging, an experienced agent can help you understand the results, explain your options, and work with all parties to determine the best path forward.
Whether you’re preparing to sell or simply exploring your options, a Windermere agent can help you understand your home’s value, navigate changing market conditions, and guide you through every step of the selling process.
Inventory continued to grow across all four of our local market areas in June, creating a more balanced environment than we’ve seen in recent years. Compared to June 2025, home prices softened in each market area, and buyers are benefiting from increased selection and more negotiation power. Well-prepared, competitively priced homes continue to attract strong interest, so seller strategy matters more than ever.
KING COUNTY
King County continued its transition toward a more balanced market as active listings increased 16% year over year. The additional inventory likely contributed to the 5% decline in the median residential sold price, bringing it to $986,250. As buyers gained options, sellers showed more flexibility, with nearly one-third of homes selling after a price reduction. Pending sales slipped 8% from a year ago, a sign that buyers are active but more selective. In the condo segment, the median price dropped 11% while active listings increased 18%.
SEATTLE
In June, Seattle remained one of the more competitive markets in the region, even as conditions continued to balance out. Active listings increased just 3% year over year, the smallest bump among our four market areas. The median residential sold price fell to $1,010,000, down 6% from last year and 3% from May. Well-positioned homes remained in demand, with 30% selling above asking price and 80% going under contract within 30 days. At the same time, buyers were more deliberate and patient than in years past, and pending sales dropped 11% while closed sales fell 7%. The condo market followed similar trends, with the median price dropping 5% to $557,475 as active listings rose 9%.
EASTSIDE
The Eastside posted the region’s largest inventory gain in June, with active listings climbing 29% year over year. Available inventory reached 3.3 months of supply, a new 10-year high. The median price for a single-family home edged down 3% year over year to $1,560,000. Sellers adjusted to lowering prices and growing inventory, with nearly 40% of sales closing only after a price reduction. Buyers acted quickly: 78% of homes sold within 30 days. Pending sales declined 9% year over year, highlighting the importance of preparation and pricing. Eastside condos followed the same pattern, with the median price down 11% and active listings up 29%.
SNOHOMISH COUNTY
Snohomish County stood out last month as the only one of our four markets with year-over-year increases in both pending sales and closed sales, rising 8% and 3%, respectively, even as active listings rose 26%. The median residential sold price settled at $750,000, down 8% from last year and 6% from May. Sellers adapted to the shift, and 32% of homes sold after a price adjustment. Buyer activity remained high, with nearly three-quarters of homes going under contract within 30 days. In the county’s condo market, the median price fell nearly 20% to $487,500 as active listings increased 43%.
LOOKING AHEAD
As we move through the heart of summer, inventory growth continues to reshape our local housing market. Buyers are gaining options and leverage, while sellers who price strategically and prepare their homes thoughtfully are achieving the strongest results. Although elevated interest rates and affordability challenges will likely influence buyer decisions in the months ahead, today’s more balanced market creates opportunities on both sides of the transaction. An experienced Windermere advisor can help you understand local conditions, identify opportunities, and develop a strategy aligned with your real estate goals.
An untidy closet can clutter your mind. Organize your closet section by section and you’ll improve your morning routine, get rid of extra belongings, and clean up your home in the process. Before you begin your closet purge, it helps to visualize how you want it to look. Your closet’s size and dimensions will determine much of what you’re able to accomplish, but the goal is to get it nice and neat regardless of size. Here are a few tips to help you get started.
5 Tips to Organize Your Closet
1. Start From Scratch
Before you can build up the closet you’ve wanted, you have to empty out the old one. Start by clearing your closet of all your belongings and placing them in nearby storage. Take out all your hangers and any clothing bins that aren’t fixed in place. This allows you to take a step back and build from the ground up. It’s also an opportunity to clean the corners and hard-to-reach areas that don’t normally make it into your cleaning routine.
2. Add Shelves
Take measurements while your closet is empty to see what shelving can fit. When shopping for shelves, consider your wardrobe inventory. Do you have more pairs of shoes than pants? Which items take up more space than others? This will help you decide on the perfect set of shelves to address your needs. Keep in mind that the most commonly used items should go toward the front of your closet for easy access. Seasonal items like raincoats, snow gear, and bathing suits that you don’t use as often can go toward the back. Design your shelves to address these needs.
3. Maximize Space
Maximizing your closet space comes down to two main factors: design and storage. You can have the best closet design in the world, but if it doesn’t allow room for storage, then your wardrobe will be overflowing before you know it. Shelves with multipurpose storage and vacuum bags are two space-saving products that can make a huge difference in available space. A clothing rack is a useful tool, not only because it allows you to hang clothing neatly along the rod, but some products also come with underneath storage that can free up even more space.
Image Source: Getty Images – Image Credit; miljko
4. Use Corners
Yes, your closet walls provide a nice home for shelving, clothing racks, hanging rods and the like. However, they’re not the only space where you can focus your organizing efforts. Instead of missing out on the negative space in the corners of your closet, use them to your advantage. Search for corner shelves that fit within your dimensions and fill them with items you would have had to place elsewhere. You’ll be surprised at how much space they can save.
5. Curate Your Closet
Now that you’ve taken steps to organize your closet, you’re ready to curate it. Iris Miyasaki (wardrobebysaki.com) is an expert in closet curation. As she puts it, closet curation is a stylistic approach to organization; it’s all about looking at your wardrobe through the lens of how those pieces get used in your life and arranging from there. “When you can see all your clothes, shoes, and accessories, you’ll want to use them more. I focus on creating a visual palette for my clients, whether that means organizing by color, silhouette, or types of items. The idea is to create a closet they’ll want to ‘shop’ in,” says Miyasaki. Once your closet is cleaned out, you’ll have freed up the mental space to look at your closet with curation in mind.
For more on all things home décor and homeowner tips, head to the Living section of our blog:
Summer is the season for outdoor entertaining, which means it’s time to fire up the grill and dust off the patio furniture. But is your yard the grilling paradise you want it to be, or is it more of a fixer-upper? Here are a few tips to get your backyard in prime shape for the searing, savoring, and relaxing to come.
What’s your vision?
Before diving into the details, let’s start with the vision question: What kind of grilling station do you want? Are you aiming for a cozy spot to share meals with friends and family? Or are you looking to transform your yard into the ultimate grilling paradise? Setting clear goals will guide your preparations and upgrades.
Basic grilling setup
If your goal is a simple, functional space where a few friends can share a meal, focus on the essentials:
Choose a less-trafficked location:
Even a small grill station will take up significant space, not to mention the crowd it may attract. With that in mind, avoid situating it in areas of high foot traffic, such as near the stairs of your deck or along a main walking path. Be sure to provide ample room between the barbecue and your backyard seating.
Pick the grill for you:
If you’re looking to buy a new grill, consider your tastes and needs. Do you love imparting a rich, smoky flavor to your grillables? Charcoal may be your jam. If you prefer speed, convenience, and temperature control, gas is the likely choice. Keep in mind that simple charcoal grills are often more convenient for small yards, as you can easily move them aside when you’re done grilling. Most standalone gas grills come on wheels, but their bulk and weight make them less mobile in comparison. Growing in popularity, electric grills may be the safest and most convenient option—you’re always stocked with fuel—but purists may balk at grilling over anything but an open flame. Plus, repairs can be costly.
Create a prep area:
Your grilling area will be greatly enhanced with a prep and serving station. It doesn’t need to be elaborate—even a small table or cart can do the job. Ideally, it’ll have room for your grilled foods, condiments, and utensils. Even better if it can hold items like a cutting board, plates, and serving platters.
Make your guests comfy:
The right combo of seating will add the social touch to your BBQ setup. Bench seating is a popular option for grilling on the deck, while chairs on the grass impart more of a picnic feel. Choose enough seating for your typical group size, with a mix of chairs and perhaps a small table or two. A picnic table is a popular choice if you have the space. Also consider an umbrella or canopy for shade and weather protection.
Build some ambience:
Installing a fire pit will create a fun social space once the sun goes down. Plenty of styles are available, including simple tabletop models, fire pit bowls, metal standalones, and rustic chimineas. In making your choice, consider factors like cost, style, size, and how the fire pit matches your yard’s design. Adding String lights, lanterns, and/or tiki torches can also make your yard more inviting.
Mixed gender and diverse ethnic group of friends gathering by the pool, with string lights and barbecue, enjoying an informal evening party outdoors.
Ultimate grilling Shangri-La
If you’re dreaming of a more elaborate outdoor kitchen and entertainment area, start planning for these features:
Add a high-end grill and smoker:
Some backyard chefs take grilling seriously. If your smoked brisket and grilled stuffed peppers are already a point of pride, consider upgrading to a smoker or high-end grill. Smokers cook at lower temperatures over a longer period, which infuses meats with deep, smoky flavors and results in incredibly tender and juicy textures. High-end gas grills have a host of features that set them apart from basic grills, including more cooking space, better heat distribution, and built-in thermometers for precision cooking. Many also offer innovative side burners for cooking up veggies or boiling water.
Install outdoor countertops:
The most memorable outdoor kitchens mimic indoor kitchens, complete with ample counterspace, underside storage, and often a built-in dishwasher, sink, and/or fridge. Installation can be complicated, especially if you add plumbing or electrical, but the final product can transform your outdoor living space into a culinary haven. Select a durable material that suits the style of your home and your cooking style. Natural stone, concrete, or tile are good choices. Make sure to include plenty of built-in storage for grilling tools, utensils, and outdoor dining essentials.
Create a comprehensive seating area:
Outdoor living is a different mindset than backyard grilling, so look for ways to integrate multiple seating areas, including a dining table, lounge chairs, an outdoor sectional, and possibly a bar area (bonus points if it blends seamlessly with your countertops). Not only can you host bigger gatherings, but you can move your party from one area to another as the evening progresses (very sophisticated). You can get more mileage out of your space by adding a pergola or retractable awning for all-weather entertaining.
Enhance your lighting:
Built-in lighting can improve both your space’s functionality and its ambiance. At the minimum, install task lighting for areas where you’ll be doing most of the cooking and prep work and ambient lighting such as string lights or wall-mounted sconces around the seating areas. Consider accent lighting to showcase some of your area’s most elegant features, such as architectural details, plants, or pathways.
Upgrade your sound:
A myriad of sound systems are available to set the mood, from basic weather-resistant speakers that connect to your phone via Bluetooth to integrated sound systems that communicate with your home’s existing audio setup. More advanced setups have different audio zones for different areas, such as louder music near the grill and softer music near the dining or lounging spaces.
By starting with a clear vision and breaking down the process into manageable steps, you can create the ideal grilling station for your wants and needs. And remember, you can always start simple and build toward your dream outdoor kitchen in the future. Happy grilling!
Much can be determined about the conditions of a local real estate market by examining supply and demand. When the supply of available homes exceeds buyer demand, it’s known as a buyer’s market. Reduced listing prices, longer days on market, and an increase in price reductions are all common signs of a buyer’s market.
While market conditions can vary widely by region, neighborhood, or price point, understanding how a buyer’s market works can help you navigate your home search when opportunities arise.
What is a Buyer’s Market?
A buyer’s market creates favorable conditions for those looking to purchase a home. With more homes available than active buyers, sellers often face increased competition for attention. This gives buyers more options and, in many cases, greater flexibility throughout the home buying process.
In a buyer’s market, inventory levels tend to be higher, allowing buyers to take more time to compare homes and identify the right fit. Properties often remain on the market longer, and sellers may be more willing to adjust pricing or offer concessions to attract qualified buyers.
It’s important to remember that real estate markets are local. Even when broader market conditions favor buyers, some neighborhoods or property types may remain highly competitive.
To better understand what’s happening in your area, connect with a Windermere agent for insight into local inventory, pricing trends, and market activity.
How to Approach a Buyer’s Market
While a buyer’s market can create advantages, having a clear strategy remains important. Buyers often can be more selective, carefully comparing homes and evaluating their options without the urgency that typically accompanies a seller’s market.
A buyer’s market can also create favorable conditions for negotiations. With fewer active buyers competing for homes, sellers may be more willing to negotiate on price, closing costs, repairs, or other terms. This is one reason why working with a buyer’s agent can be especially valuable. An experienced agent can help identify opportunities, navigate negotiations, and guide you through each stage of the buying process.
If you’re selling your current home while searching for your next one, you may have a better chance of including a home-sale contingency in your offer. While contingent offers are often challenging to secure in highly competitive markets, sellers may be more receptive when buyer demand is lower. When structured properly, a contingency can provide added flexibility by allowing you to complete the sale of your current home before moving forward with a purchase.
Homes that have been on the market for an extended period can also present opportunities. Longer listing times may indicate that sellers are more open to negotiating. However, buyers should still work closely with their agent to evaluate the home’s value and develop a competitive offer strategy.
In many buyer’s markets, sellers take extra steps to make their homes stand out. This can include completing repairs, making updates, improving curb appeal, or offering incentives to attract buyers. As a result, buyers may have additional leverage when negotiating repairs or requesting concessions during the inspection process.
Even in a buyer’s market, preparation remains key. Having your financing in order, understanding your budget, and working with a knowledgeable real estate professional can help you act confidently when you find the right home.
Thinking about buying a home can be daunting, especially if it’s your first time. What should be an exciting milestone can feel overwhelming without a clearly defined roadmap, and diving in headfirst without a solid plan can lead to unnecessary stress, financial surprises, and missed opportunities. However, by establishing a timeline and breaking the process down into manageable steps, you can move forward with confidence and clarity.
Here is your month-by-month guide to preparing for a successful home purchase in the following year.
12 – 10 Months Out
Know Your Why
Understand your motivation for buying. Are you relocating, growing your household, or ready to invest in your future? Clearly defining your “why” will help shape your search criteria and influence your budget, location, and timeline.
Set Clear Goals
Start to think about what you want in your new home. Create a list of your wants versus must-haves, including location, budget, size, and style of home. These goals will act as a compass throughout your search. Be sure to include your ideal timeline and what you hope to get out of the overall experience.
Find an Agent That Prioritizes Your Goals and Timeline
A trusted real estate agent is more than just a facilitator; they’re a guide, negotiator, and advocate. Look for someone who understands your timeline and long-term vision and is familiar with the local market. Ask them to provide a first-time buyer’s guide or checklist to help you get started. Building this relationship early allows your agent to understand your needs and preferences in advance, setting the stage for a smoother process when you’re ready to make your move.
9 – 7 Months Out
Assess Your Finances
Take a close look at your income, debt, and spending habits. Use this time to create a monthly budget that includes future mortgage payments, utilities, insurance, taxes, and home maintenance. Many experts recommend spending no more than 28% of your gross monthly income on housing costs.
Boost Your Credit
Your credit score has a significant impact on your buying power, including your mortgage rate and loan approval. Take the next few months to pay down high-interest debt, stay current on all payments, and avoid opening new credit accounts. Check your credit report for errors and work on improving your score if needed.
Start Saving
You’ll want to have enough set aside not only for a down payment, which is typically 3% to 20% of the purchase price, but also for closing costs, moving expenses, and initial home repairs or furnishings. During this time, try to avoid nonessential major purchases and think about setting up a dedicated home savings account to stay consistent.
6 – 4 Months Out
Talk to a Financial Advisor
A financial advisor can help you align your financial goals with your homebuying plans. They can offer advice on what you can realistically afford and help identify areas to strengthen your financial readiness. You can also use tools like an online mortgage calculator to get a clearer idea of what your future monthly payments might look like.
Start browsing homes and monitoring prices in the neighborhoods you’re interested in. Learn whether your local market is currently favoring buyers or sellers and what that could mean for your strategy.
Meet with a Lender and Get Pre-Approved
Meeting with a lender and getting pre-approved can help give you a clear picture of how much you can borrow and what price range to shop within. It also shows sellers that you’re a serious buyer when the time comes to make an offer. Your realtor can recommend trusted lenders to work with and assist you through this process.
Start Your Home Search
Now that you have your list of wants and needs and know your price range, you’re ready to start searching for your dream home. Use online property research tools to filter by location, features, and price to see what’s available in the locations you like. Narrow down your top homes and start scheduling showings and comparing listings.
1 Month Out
Make an Offer
Once you find “the one,” your agent will help you craft a competitive offer, negotiate terms, and guide you through contingencies.
Get a Home Inspection If your offer is accepted, a licensed inspector will identify any issues with the property before you finalize your purchase. Depending on what comes up, this can give you leverage to negotiate repairs or price adjustments.
The Time Has Come
Closing On Your New Home You’ve made it! During closing, you’ll sign paperwork, pay final costs, and receive the keys to your new home. Your agent and lender will walk you through the final steps to ensure everything goes smoothly.
Buying a home may seem like a big leap, but with a solid 12-month plan and the right support, it can be an extremely rewarding experience. Take it one step at a time and know that a trusted agent is here to help whenever you’re ready.
Whether you’re retiring, moving into a smaller space, or simply want to live more minimally, downsizing can simplify the process. After all, the fewer belongings you have, the less you need to pack, move, and organize in your new place. But for many of us, the mere idea of downsizing can be daunting. How do you decide what to keep and what to let go of after accumulating a lifetime of possessions, mementos, and memories?
The secret, as it so often is, is to plan ahead. Here are some tips to make downsizing easier.
Start early:
Begin the downsizing process several months before your move date if you can. Starting early allows you to pace yourself and avoid last-minute rushes. It also gives you time to work through your emotions, so you’re less likely to keep something you don’t use simply because you’ve owned it for years.
Create a downsizing calendar:
Budget your time by dedicating specific days or weekends to different tasks, such as sorting through possessions, donating items, and dealing with recycling or disposal. Like a to-do list, a calendar can inspire action by giving you a clear agenda for each day or week.
As part of the process, research where to drop off items and their operating hours to improve efficiency. For example, you may need to schedule pickups or drop-offs for local charities or other organizations that accept donations. Also allow extra time if you’re posting items online, as they may take longer to sell.
Sample calendar:
Week 1: Sort through bedroom clothes and accessories.
Week 2: Declutter books and paperwork.
Week 3: Tackle the kitchen (utensils, appliances, etc.).
Week 4: Assess living room furniture and storage.
Weeks 5 and 6: Tackle the garage and/or basement.
Week 5: Organize garage sale or list items for sale online.
Week 6: Donate remaining items and arrange for recycling or disposal.
Develop criteria for making decisions:
When planning, factor in your reasons for downsizing, and use these as criteria when faced with difficult choices. For example:
If you’re simplifying: Keep items that bring you joy and get rid of items that cause stress. Prioritize items that add meaning to your life or hold sentimental value.
If you’re cutting costs: Consider getting rid of items associated with costly hobbies or that require expensive maintenance.
If you’re moving into a smaller space: Prioritize belongings you use regularly or that serve a practical purpose. Let go of items that are rarely used or have no clear function.
Sort items by their intended destination:
Designate specific areas for items you plan to keep, donate, sell, recycle, or dispose of. Use labels or colored markers to clearly mark each pile.
Keep: Items that fit your decision-making criteria (see above)
Donate: Items in good condition that others can use
Sell: Valuable items you don’t need but can convert into cash
Recycle: Items that are broken, outdated, or no longer useful, but that can be recycled
Discard: No longer useful items that can’t be recycled
Take it room by room:
Treat each room as a separate project. You may want to start with a smaller room that you’re less emotionally attached to, like a home office, to make decisions easier. Once you’ve finished each room, give yourself a pat on the back before moving to the next. Recognizing these smaller accomplishments can provide a mental boost as you work towards achieving your larger goal.
Consider off-site storage:
If you don’t have as much time as you’d like or have more valuable items than your new space will accommodate, consider renting an off-site storage unit. Some people use storage units for six months to a year after a move, allowing them to sort through their items at a more deliberate pace. This approach lets you gradually incorporate some items into your new living arrangement and decide what to do with the rest. However, be careful not to fall into the “out of sight, out of mind” trap. It’s easy to neglect a storage unit, only to realize years later you’ve made little progress.
Take time to reflect:
For many people, the hardest part of downsizing is letting go of belongings with sentimental value. Give yourself time to process the emotions tied to these items. Think of them as treasured memories rather than losses, and take photos of items you cherish but can’t keep. Shifting your perspective can also be helpful. This can be a liberating transition to a new lifestyle—one that’s more thoughtful about what’s worth holding onto. And remember, there are always new memories to be made!
For many of us, pets are important members of our household, which means our homes should be as comfortable for them as they are to everyone else who lives there. When choosing how to decorate your home, whether you’re moving into a new one or welcoming a new furry or feathered friend into the one you already live in, thinking ahead about their needs can not only create a happy space for everyone but also help with the inevitable pet-related accidents and other possible issues down the road.
Cuddly-friendly Furniture
While some pet owners refuse to let animals on couches or chairs, others love to cuddle with their furry friends on or near their laps. If you fall in with the first group, create a soft space on the floor for Fido or Fluffy to lie on when the family is relaxing. Dog and cat beds come in just about every material, color, and style you can imagine, so finding one that fits in with your aesthetic should be relatively simple.
If you’re in the second group, select furniture that can withstand the wear and tear of claws, accidents, and frequent vacuuming. Leather (or faux leather) surfaces are best for homes with animals that shed. If you prefer the feel of fabric instead, choose a couch or loveseat made from stain-resistant materials or use a washable slipcover.
Throw blankets are not only cozy, but they are also great for creating a barrier between pets and furniture, and they’re a lot easier to clean than an entire couch.
Safe Plants
Incorporating live plants and greenery is a great way to add a touch of nature to your home’s interior, but not all plants are safe for pets. While fake plants are an option, they don’t provide the extra benefit of helping to clean the air you breathe while indoors.
Rattlesnake plants, spider plants, orchids, many kinds of fern, and small palms are all beautiful additions that aren’t toxic if your pup or kitten takes a nibble. There are also many types of succulents that are pet-safe, and the spiny ones will deter a pet that’s looking for a snack or—in the case of some cats—a litter box.
Flooring
When it comes to pets, accidents are usually inevitable. As well behaved and trained as they may be, pets get sick, old, and stressed. Though messes are bound to happen, lingering stains don’t have to. Hardwood, tile, and vinyl floors make it easy to wipe up anything your pet leaves behind, as well as spills they may cause. Washable rugs come in dozens of attractive styles and are great at protecting floors, especially if you add a pet-proof pad underneath. Put plastic or vinyl mats under pet feeding areas to protect floors from spills and to prevent bits of food from spreading throughout the house.
Colors
The best way to camouflage pet hair in between sweeping and vacuuming is to select furniture, carpets, and décor items that match your pet’s coat. If you’ve got a brindle pup, calico kitty, or multi-colored animal friend, patterns will be your best bet. Florals, plaids, stripes, paisleys, and other patterns also help hide stains when those inevitable spills and accidents happen.
Hidden Essentials
Our animal buddies are sweet, cute, and cuddly, but not everything about having a pet is attractive. Litter boxes, feeding stations, and sleeping crates take up a lot of room and can be eyesores. Fortunately, furniture makers have taken notice and created pieces that are both aesthetically pleasing and functional.
For indoor kitties, litter boxes are necessary, but constantly seeing and smelling them isn’t. Get the box out of sight with a stylish litter box side table. Dogs can nap in style with a crate that doubles as an end table or nightstand. Feeding stations with storage make dinner time easy and keep unsightly bags of food hidden away.
Your love of animals doesn’t have to get in the way of living in style. These tips should help you find the right balance between the two.
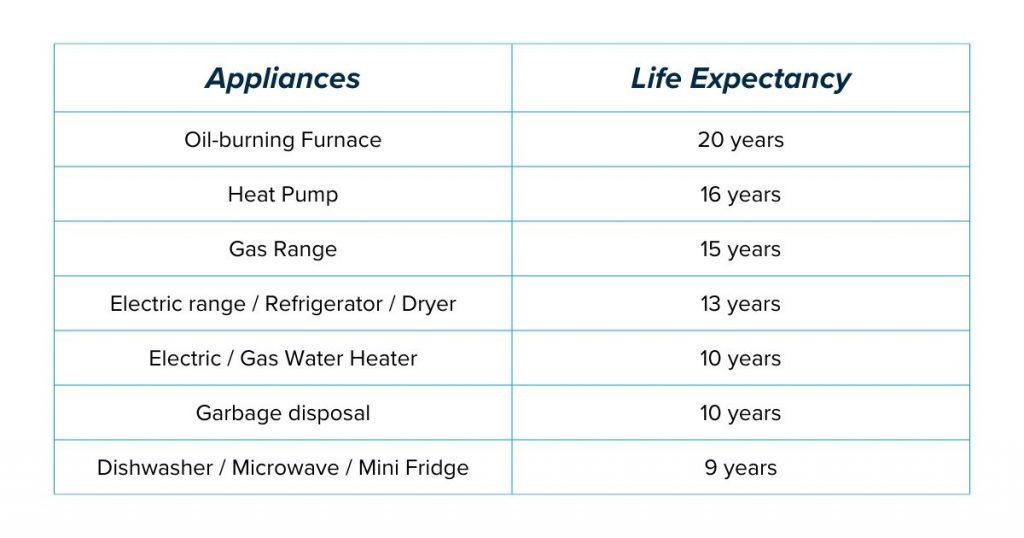
Every component of your home has a lifespan. Common questions asked by homeowners include when to replace the flooring or how long to expect their siding to last. This information can help when budgeting for improvements or deciding between repairing and replacing when the time comes. We’re all familiar with the cliché: They just don’t build things like they used to. And while this may be true when it comes to brick siding or slate roofing, lifespans of other household components have increased in recent years. Here are the life expectancies of the most common household items (courtesy of NAHB):
Appliances:
Among major appliances, gas ranges have a longer life expectancy than things like dishwashers and microwaves.
Kitchen & Bath:
When choosing your countertops, factor in the life expectancies of different materials.
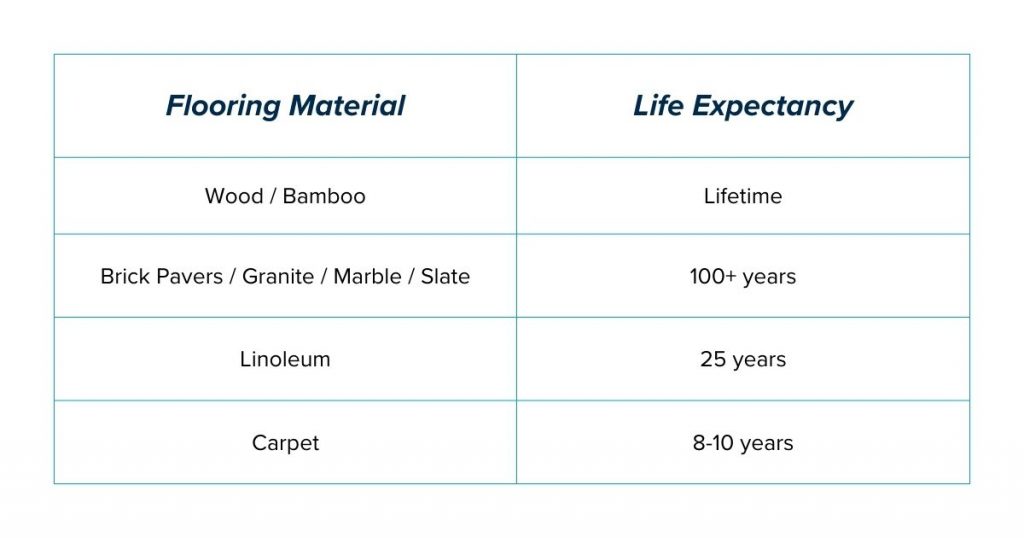
Flooring:
If you’re looking for longevity, wood floors are the way to go. Certain rooms in your home will be better suited for carpeting, but you can expect they’ll need replacing within a decade.
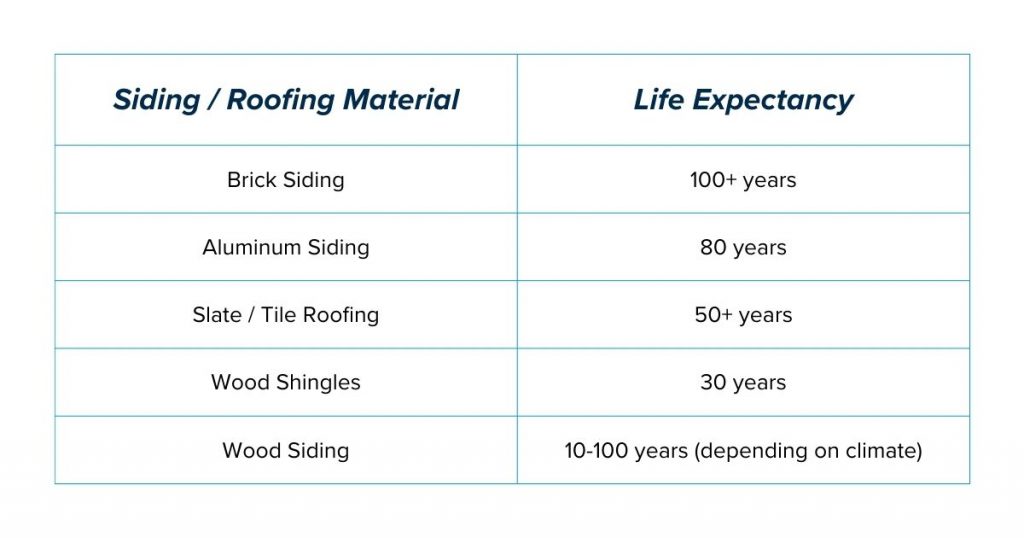
Siding & Roofing:
When choosing roofing and siding for your home, climate and maintenance level factor into the life expectancy of the material. However, brick siding and slate roofing are known to be dependable for decades.
Are extended warranties warranted?
Extended warranties, also known as service contracts or service agreements, are sold for all types of household items from appliances to electronics. They cover service calls and repairs for a specified time beyond the manufacturer’s standard warranty.
You will have to consider whether the cost is worth it to you. For some, it brings a much-needed peace of mind when making such a large purchase. Also consider if the cost outweighs the value of the item. In some cases it may be less expensive to replace a broken appliance than to pay for insurance or a warranty.

 Facebook
 X
X
 Pinterest
 Copy Link